Konnitiwa! We are Araki F Machine.
Address Kasai city Hyogo pref Japan
Araki F Machine makes anything. We own a lot of machines in the factry.
This blog is made by Google translation.
Japanese → Google translation → copy & paste → English.
I prior to the centering of the wheel, was the replacement of the bearings.
The bearing was not bad even without replacement. But, it is incidentally that was disassembled.
I After removing the oil seal, was welded steel bars. This clamp for temporary fixing.
I have to fix the grounding of welding at the brake bolt hole.
The rod of steel is stuck with welding, you can remove it and hit it from the opposite.
You had better remove the rubber seal of the bearing.You can well welding.
You remove the one side, the opposite can be hammering.It easily removed.
Once you get in both sides of the bearing to push hit the new bearings.
If once you hit just the inner race, ball spoil.
Outer race or the whole, it hits.
State of press-fitting the bearing.
Bearing of part number
6303LLU C3 Quantity 2
Bearing is not a genuine parts. Made NTN.
Oil seal
93106-28023 Quantity 1
93105-45017 Quantity 1
I did a centering after this.
It will tubeless reduction with OUTEX tubeless kit.
Completion Once fit the tire.
Front tires
110 / 70R Dunlop α-13 SPORTMAX
Part number 304 541
Incidentally rim width 3.00
I did a rotor bolt with a new one. Part number 90111-08003 six
Front tire does not particularly interfere with the body.
I was able to sell to Naoyan it between Bon vacation, front tire that was removed from this RH03J.
I was exchanged also the wheel in the new bearings.
I was such a thing to one months ago.
August 14 to 16 in Japan is the Obon holiday.
I single in the past, was remodeled SR500 to 17 inches.
It cornering is good. I can rub the step with confidence.
So I had to buy a rim and the hub.
Rim width of the front is 3.00. Webike is good to order it. It's easy because there is an input form.
You can choose the color, the four colors of gold,silver, black and blue.
Now, I have a SR400 type of RH03J.
I decided to bestow the "Naoyan" to that of the front around. "Naoyan" is my friend.
Assuming there is no wheel.
So I decided to assemble the 17 inches wheels, during the Obon holiday.
RH03J is this type ↓ is the current fuel injection.
This wheel hub's rusty second-hand goods. I bought at the auction site. Sandblast it, and paint.
RH01J later hub's common. So it has in abundance.
SR's originally 18 inches.Spoke are too long, for 17 inches wheels.
So I will use Nexxs made of spokes, the part number SPF-Y02.
The spokes set of Nexxs contains two types of spokes.
They are entered in each bag that says outer and inner. Length is different.
However, they are not separated on the inside of the hole and outside the hole.
In fact it is the lights and left.
Short spoke to the disk side
Long spokes on the opposite side
I wrote a line with magic pen, in order to not confuse. I think you are faintly visible.
The front wheel is temporarily fixed all spoke by twist tie, before fitting to the rim.
In this way it will be temporarily fixed all of the spokes. However, this image is not knitted by mistake.
Knitting is this.
Four beyond the spoke and cross.
At that time, it is above the outside of the hole.
And I make the centering.
Runout is OK when I become a 1mm or less.
Since the rim and spokes new, it's easy. Deviation is less, from the beginning.
Until spoke is good tension, you will continue to tighten each a little while watching the deviation.
When the wheel is 18 inches to 17 inches, an outer diameter of the tire changes.
So it shifts the value of the speedometer.
This will be resolved by using the meter gear for XJR400.
This is a second-hand goods. I washed with brake cleaner, it was previously put plenty of grease then.
If you buy it with the new article.
Yamaha genuine parts of part number
4HM-25190-00
Price 5389 yen
Next time I'll try to buy a new one. To ascertain to what can be fixed,
Naoyan is revive the SR400.
It is a bike he was riding when a high school student.
It's 20 years ago ...
He had it until now. I'm surprised.
Leak fuel cock,
Clutch lever that his brother was folded to overturning
The cured tire cloth seemed to
Fuel hose, such as plastic
Cab main jet is non-removable by rust
Rust rod rear suspension
Rust front fork
Rusty chain
Apex sprocket
Rust throttle wire
Strengthening clutch wire (However, the grip strength)
...
All exchange.
He bought a several hundreds of thousand yen worth of parts. (Rates secret, to his wife)
Rear suspension --- made Daytona
Cab --- Keihin FCR35
Front fork --- for RH03 (type of injection)
Front fork gave for RH03 I have. It will use it with OH.
This time of SR is front drum brake. It me to update to the disk brake.
By the way, my RH03 front is gone. This I assemble them.
This was ready to can run.
Finally.
It is completed.
The owner told me, when it is entrusted.
"I want you to be able to run this bike. It does not matter with a minimum of maintenance. Even just changing only the tires and the battery is."
If it was that I had a restore, it deviates from the request contents.
So I was completed in this state.
I'm not doing these.
Fork
Stem
Rear suspension
Engine
Exterior
These I want to be someone doing the owner. While using.
I made plastic model for the first time in a long time.
Hasegawa FA02
Accessories for movable figure 1/12
Desk and chair in the room
The kit contains these, desk two and chair four.
This is what I will be assembled without any adhesive.
This is not enough reality. Paint it's necessary.
I want on top of the desk!
Ashtray, coffee, notebook PC.
I had put this was completed.
Then, everyone is to destroy the chair. In an effort fold it
I will fix it, every time.
This can not fold!
When Tattsuan came, he was playing with making such as "job interview arrangement".
"Center director. Right's role to take notes." I was saying.
He is rich in imagination.
This company has the other series also. It's like science room desk. Hasagawa
I remembered.
I previously, there was also that it has bought a plastic model of the machining center.
Fuel tank, fuel cock OH has been completed.
I put a little brake cleaner from the plug hole, kicked the kick pedal. ...
Banzai, run the engine!
I was surprised. This engine is the throttle response is sharp. To refer to have been manufactured in more than 50 years ago.
I tried riding on this. It is very fun.
Because there is a valley of torque in the medium speed range a little.
It is fun to run to avoid the there.
Suddenly riding will be fun, in the only valley of torque a little.
I detect a whiff of Soichiro Honda, from this seasoning.
Electrical system was alive all, the lucky thing.
However, only, turn signal relay does not blink.
This bike is it more than 50 years of age, so I have no choice.
I tried the treatment by Shaktipat. Of course, failure.
This is old large turn signal relay.It is likely to be overhauled, because large.
However, I was treated by replacing the modern turn signal relay.
I when I'm doing other various maintenance, I was a rust removal of the parallel to tank.
I looked into the tank from the filler neck. It was not bad. So it is not necessary incision.
I decided to remove the rust in the rust-removing solution of the chemical.
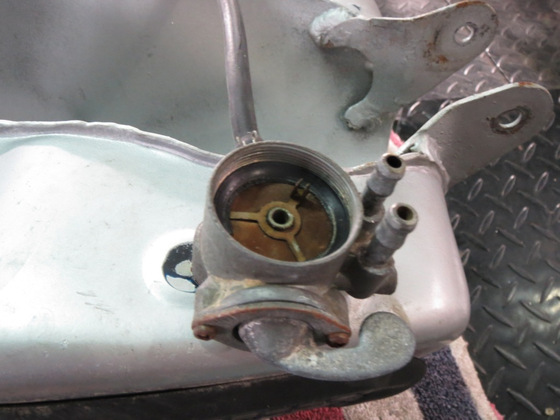
First, upon put the rust removing solution, it's necessary that the pet cock stop the rust removal solution. So, first I OHed the pet cock. The packing has been deformed by curing. Hard!
Hardened alteration gasoline is there. So the situation is not bad.
Individual components are all genuine parts were available. Strainer nor packing. I wash it with kerosene and carb cleaner solution. After that, I was assembled applied thinly grease.
I've noticed, in the middle of work. Edge of the tank is an ordinary welding.
It seems handmade tank.
By the way we have the current tank is welded by seam welding. This welding fast. Though not leak.
It is a video that has been picked up on YOUTUBE ↓
It puts a rust removing solution. The 2nd left.
Rust removing solution seems to have these. "phosphoric acid based," "otherwise".
Phosphoric acid based "strong rustremoving performance", "phosphate coating after rustremoval" are the advantage. However, it will hurt the paint slightly.
This time, I used the type of phosphorus-free. Components do not know because the title is not.
Is this a "weak chemicals title of obligation is not"?
However, this also it is written, just as the film can be a phosphoric acid type.
In the 21 century,
Another thing to watch is gone, large selenium rectifier.
The charging system of vintage bikes have this is used. In modern times, you can have the same function, a small diode.
In most cases, there is no regulator function in vintage bike, it's only the rectifier function. So, when the battery dies, the voltage rises to excess. Light bulb will expire all.
Regulators less bike generating capacity is set to low.
Rotation of the engine ---
Low-rpm --- it is not little enough charge
High rpm --- Little overcharge, but, the degree to which the battery is not to die
It has become as described above.
If you overcharge, so would decrease immediately liquid, it will do as soon as the battery is dead If you do not look at the frequently liquid level.
Charging a lack of low-rotation blame of charging coil, this is not any way.
Overcharging of the high rotation it will prevent if there is a regulated function. Its function is to chop in about 14V charging voltage.
So, not only to update the selenium to the diode, I decided to use a regulated rectifier.
This is the ancient of selenium rectifiers. CL72 is a single-phase full-wave rectification.
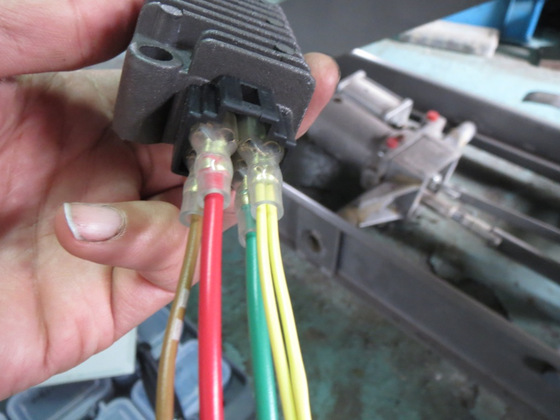
I bought a single-phase full-wave regulator made Hcraft.
Wired as shown in the image.
ステーター = Stator
赤 = red
ブラウン = brown
黄 = yellow
CL72 is not provided the wiring of ground.
You should be connected directly to the frame of the ground wire.
I've fixed this regulate rectifier in the same space as the selenium.
By making the color with lathe.
The color of the wiring has become a gray all, by dirt. Wipe and confirmation.
The wiring to and insulation.
A few days later, I made sure the voltage over the engine, it was controlled properly to about 14V.